Cedar shingle roofing installation:
Cedar shingles can provide a host of benefits from longevity to energy efficiency and greater impact resistance to your roof. However, to realize the benefits that should be expected the shingles should be installed in a particular manner considering the natural characteristics of the material.
Cedar shingles fail for several preventable reasons. Most of them have to do with the manner in which cedar shingles are installed. The Ontario Building Code (OBC) minimum specification for the installation of cedar shingles is to;
- Cover the roof deck with a roofing underlayment.
- The starter course must be a minimum of a #3 shingle.
- Nail the starter course of shingles to the deck with the first exposed course directly over the starter course.
- Tack a 12" wide strip of #15 tar paper over the shingles above the exposure line.
- Nail the second exposed course of shingle over this interwoven #15 tar paper.
- Tack on the next 12" wide strip ... so on and so forth.
To construct a cedar shingle roof in such a manner will only provide a 20 year life expectancy for the roof.
This installation manner is for an application over a heated space. The application of shingles over an unheated space, such as a shed roof, does not require the interwoven tarpaper by the OBC.
Unlike asphalt shingles, clay or slate tiles or metal roofs which run off liquid precipitation immediately, cedar shingles saturate before running off. The wood swells up, the holes around the nails pinch tighter, the shingle becomes slightly larger, then the run off begins.When the rain stops, and the shingles begin to dry, the shingles dry on the exposed face first. If they are installed to the OBC minimum, the shingles will have a moisture differential in the wood. The unexposed tips and underside of the shingle will hold their moisture longer. The dry exposed face will shink first. This will cause the shingle to curl up.
Wood breaks down due to the action of fungus. If the shingles are installed to the OBC minimum, the extended retention of moisture in the shingle will provide a very good environment for the fungus to thrive.
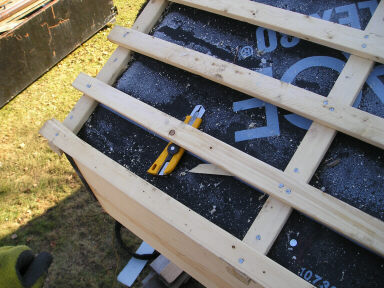
There is a means to counter act this short coming in the installation of the cedar shingles on a roof installation. By constructing the roof in the following manner, it will facilitate the drying of the shingle, reducing the occurrence of curling and cupping as well as removing a considerable portion of the moisture that the fungus requires.

Over a heated space, over a solid roof deck:
- Install roofing underlay over the entire roof deck.
- Install 1x2 (nominal) spruce-pine-fir (SPF) strap <16" oc up the pitch of the roof.
- Install 1x2 SPF strap arcoss the pitch of the roof on centres equalto the planned exposure of the shingles.
This strapping grid over the roof deck and under the shingles will allow the shingles to breathe and dry out from behind. The strapping grid is not exposed to precipitation or snow melt when the roof is complete. The strapping is over hung from the edge of the facer. This overhang of the strap on the outward and downward edges of the roof plane will be the intake vents for the shingles.
There are a couple ways to hide the ends of this strapping grid that I have used in the past. If there is aluminum facia already installed, I have used a double run of aluminum shingle starter. The first over the roof deck and facia, as would be installed under steel or asphalt roofing. The second course is installed over the strapping grid. As the strap grid will be roughly 1 1/2" thick, be certain to select a starter that has its exposed face greater than this dimension.
Another method that can be used is to install a stepped out shadow facia in the event there is already a wood facia previously installed. If in the case of a new construction,the choice is yours. The key is to allow fora vent intake on all possible outward edges of all roof planes.
